Thursday, September 27, 2012

Pear Pie with Gouda

I love pie.  My obsession began as a little girl when my grandmother taught me how to make my first pie crust and would send me and my sisters out to pick blackberries for hours just to make that one perfect blackberry pie.  As a grown up I have taken my pie obsession to new heights.  With the help of my best friend who is also a bit of a pie fanatic, my pie crust has evolved and become perfect (sorry, Grandma!).  The only that makes my pie crust better, is a really great filling.

As the weather turns cool in the Fall there is nothing better than the smell of pie baking, filled with delicious seasonal fruits and spicy cinnamon.  It makes the whole house feel so cozy and when you each slice is like a little piece of heaven on a plate as it warms you from the inside. 

One of my favorite pies to bake in the Fall is Pear with Gouda cheese melted into the top crust forming a salty crunchy top layer that pairs perfectly with the filling.  You can leave the cheese off of the crust and brush it with an egg wash and sprinkle with sanding sugar if you would prefer, but the cheese is a delicious addition to this recipe.

Pear Pie with Gouda Crust

For the Crust:
3 cups all purpose flour (sifted)
1 tsp salt
1 cup unsalted butter
1 egg, slightly beaten
1 tsp white vinegar
3-4 tbsp ice water

For the Filling
4-5 large pears, peeled, cored and sliced (approx. 5 cups)
3 tbsp flour
1/2 cup sugar
1/4 cup brown sugar
1 tsp cinnamon
1/8 tsp nutmeg
1/4 tsp salt
2 tbsp butter

Topping:
1/4 cup finely shredded Gouda cheese
  1. Preheat oven to Combine the flour and the salt and mix thoroughly.  Cut in the butter using either a pastry blender or two forks until crumbly and the largest pieces of butter are pea sized.  Whisk together the egg and the vinegar, then add to the butter mixture.  Stir gently until combined.  Add the water 1 tablespoon at a time just until combined.  Be careful not to over mix your pie dough.  Divide the dough in half and gently roll each piece of dough between two sheets of parchment paper to form a round that will fit an 8 or 9 inch pie pan.  Gently lay one of the dough rounds in the bottom of your pie pan and set in the refrigerator until ready to fill.  Place the other pie round in the refrigerator, as well, to keep cool until you are ready to top your pie.
  2.  Combine all of the filling ingredients in a large saute pan and bring to a boil over medium heat.  Turn off heat and allow to cool. 
  3. Pour the filling into the prepared pie crust and top with the second pie crust round.  Crimp the edges to seal and cut off any excess crust.  Cut 3 to 4 vents in the top crust and sprinkle with Gouda cheese.  Bake at 425 for 50 minutes until the cheese is golden and the filling is bubbly. 

Thursday, August 23, 2012

Homemade Dishwasher Detergent TABLETS!!

With my tiny girl becoming a toddler (who gets into everything!) and the availability of green cleaning products on the market these days, I've become obsessed with using all natural products and inexpensive homemade alternatives to clean as much of my house as I can.  When someone from my house says "Mom, is okay if Amelia just ate______(fill in the blank with non edible item)?" I like to be able to stay calm and know that we are not on our way to the emergency room.  You may be thinking, doesn't this lady childproof her house? The answer is a confident "YES", but this kid is super smart, and it's a matter of days before she figures out, at 16 months, how to open the childproof cupboard locks.  She's already figured out how to open the refrigerator, and door handles, so I'm not taking any chances.

The homemade dishwasher detergent became a part of my repertoire as an emergency substitute to the all natural tabs that I was using. The brand that I like is only carried at one store on the other side of town, making it difficult to replenish my supply when I'm not paying attention to the number of tabs in the bag.  One of these occasions happened on a day when I had a sink full of dishes and company on their way in a matter of hours.  I had seen homemade dishwasher soap recipe on Pinterest.com and having all of the components (who doesn't keep borax and citric acid on hand?!) around decided to give it a try.  I was impressed.  The recipe worked like a charm and saved the day!

As great as this new discovery was, however, I haven't been using it exclusively because I really like the convenience of the tabs.  So, when I found myself out of dishwasher tabs again the other day, and didn't want to leave the house, I went back to my computer and scoured the internet for a recipe for the tabs...I found nothing.  It didn't make sense, there are recipes for bath fizzies and homemade tabs of all sorts, but not for dishwasher detergent?!  So to my kitchen I went.  Armed with my box of borax, washing soda, citric acid, and salt.  I was determined to find the solution to my dirty dish dilemma.  And here it is...at long last the results of my experiments that day...Homemade Dishwasher Detergent Tabs!

Homemade Dishwasher Detergent Tabs
This recipe yields 48 tabs for under $2
2 cups borax
2 cups washing soda (baking soda works in a pinch)
1 cup Kosher salt
1/4 cup citric acid
10 - 15 drops essential oil, such as lemon, grapefruit or lavender (whatever is your favorite)
approximately 1/2 cup water

Mix the dry ingredients in a large bowl and add the water a little at a time, until the mixture is moist and clumps together.  Be careful not to add too much or the dry ingredients will dissolve.  Pack the dishwasher soap into ice cube trays and allow to dry for 2 hours.  Place in a nice jar and pop one in the dishwasher for each load!


Tip: One other secret to making this work, and getting your dishes super clean, is to fill your rinse aid container with white vinegar instead of store bought rinse aid, it works much better and it's SO much cheaper.

Thursday, May 10, 2012

Fried Rice

Wow, I can't believe it's been three weeks since I started this challenge! As I was making lunch this morning, I was thinking about how great it would be if more kids could have lunches like this, wholesome, satisfying meals that fill their bellies and keep them healthy.  It's a shame that our public schools have such terrible offerings in the cafeteria, when dishes such as vegetable fried rice can be made in so little time and with such little effort.

The fried rice that I made this morning turned out delicious, I walked out of the kitchen for a minute and came back to find the kids scraping the bits off of the bottom of the pan.  I know that they are really looking forward to lunch time today.  This was a great dish, because, with a little bit of planning  (making extra rice at dinner last night), it was quick to throw together.  It took less than twenty minutes to get the lunches packed!

To make the vegetable fried rice, I scrambled a couple of eggs, then set them aside.  In the same pan, I cooked some garlic, ginger and the white parts of a couple of green onions.  Then I threw in some shredded carrots, the tops of the green onions and some frozen peas. I let that cook for a few minutes, stirred in the rice, the scrambled egg and some soy sauce and it was done!  It couldn't have been easier! I topped their meals off with some peach slices and stuck in a pair of chopsticks for them to use.  I'm sure today's lunch will be one to beat!

Wednesday, May 9, 2012

This Week...So Far

I feel like I'm settling into a nice groove with this challenge.  When I plan and shop for my weeks dinners, I also now sit down and plan lunches so I know what's coming up each day.  I have also found that, with a little planning, this challenge has added surprising little to my grocery budget each week, since I am using ingredients or dishes that are leftover from dinners during the week.


Over the weekend we made a dish we call "Haystacks", it's kind of a cross between nachos and taco salad and it is wonderful!  I promise I will post our families recipe for Haystacks at a later time, it's a favorite Friday night treat.  Since I was planning ahead, I prepared extra taco meat and set it aside so that on Monday I could send taco salad for lunch.  They loved it! And once again, no one noticed that I replaced the sour cream with greek yogurt!

For Tuesday's lunch, I honored a request for a repeat.  The big winner of the challenge, so far, is the Italian pasta salad, I think we could all eat it for lunch every day and not get bored!  This time I changed it up just a tad (mostly because I'm forgetful and I forgot to get some olives) instead, I cut some mushrooms up and marinated them in some balsamic vinegar for about 15 minutes before draining them and adding them to the salad.  Delicious!


Today being Wednesday I felt like a sandwich was in order.  So, I set aside some of last night's meatloaf to make meatloaf sandwiches today,  I was so excited about making them that when I remembered that  I was out of mayonnaise, I could let that stop me.  Thankfully, I know how to make mayonnaise and have the freshest eggs available at any time, so I whipped up a batch of delicious homemade mayonnaise for the meatloaf sandwiches, topped them with some lettuce and our favorite Tillamook cheddar cheese, and the result was the best meatloaf sandwich ever!

Last Week's Lunches

The challenge continues and so far I am definitely winning!  The un-boring lunchbox has been a huge success with the kids. They've even asked if I will continue next year!  The farther into this endeavor I get, the easier it is to come up with lunches that are healthy, satisfying and more creative that a sandwich and a bag of chips, so I will definitely continue for the next school year!  Last week's meals were a huge success, in fact, all of them have been requested for repeat!

On Tuesday I packed chicken tacos/salad, it was a hands on meal with many possibilities, I packed the shredded chicken in a separate compartment from the rest of the toppings so that they could heat it in the microwave if they chose (two did, one didn't), then I included lettuce, tomatoes, cheddar cheese and a stack of tortillas.  I packaged the salsa in a separate container so that it wouldn't make everything soggy and replaced the sour cream with greek yogurt (none of them even noticed!) I'm told it was delicious and can be packed anytime!

Wednesday has become sandwich day, but not just typical sandwiches. Last Wednesday, I packed them a sandwich of goat cheese, spinach, cucumber and ham on whole wheat.  They all told me they loved it (even the one who said that the pesto chicken the week before had way too much green in it).  I packed them a few kettle chips and some apple slices with peanut butter for dipping.  Another successful lunch!


On Thursday last week, I packed leftovers.  Not just any leftovers, however, but leftover calzones filled with my homemade pizza sauce, spinach, mushrooms, caramelized onions, italian sausage and mozzarella.  Along with the calzones I packed some apple slices, but that was it because I knew that they were going to be stuffed!

Monday, April 30, 2012

Pasta!!

So, I'm sure that many of you noticed that I didn't  post anything on Friday.  That's because Friday is the one day of the week when my son gets to eat what he refers to as a "normal" lunch at school. For the last several years I have insisted on making their lunches everyday with the exception of Fridays.  On Fridays they get to be just like everyone else and stand in the lunch line.  At my son's school, it's pizza day.  They use that term loosely as what they serve looks, tastes and smells like nothing I would feed them at home, but he likes to be with his buddies in the lunch line, and since it means that I get to sleep in one morning, I don't mind letting him eat pizza and ice cream for the sake of fitting in.

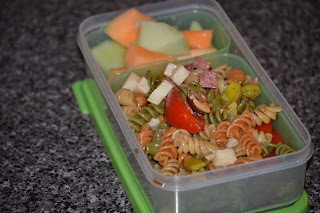
Today, though, it's back to the healthy UNboring lunch box.  I'm sure that today's pasta salad complete with mozzarella cheese, salami, pepperoncinis, olives and tomatoes is going to be a huge success and will hopefully be a frequent request. I had some myself for lunch and it was delicious!  I also included some veggie sticks and melon just to make sure that no one comes home hungry (well, any more hungry than usual!).

Thursday, April 26, 2012

Eggs-ellent Lunch!

When you have your own flock of chickens in the backyard, the one thing that you can always count on is having eggs in your refrigerator, lots and lots of eggs! So we are always looking for clever ways to use them up.  We make a lot of omelets, frittatas, scrambled egg dinners, even fried eggs on spaghetti.  You name it we've probably tried a fried egg on top it.  When we can't seem to use them up ourselves, we feed them to the dogs, share them with friends and neighbors and when all else fails a good old fashioned egg fight in the kitchen is guaranteed to use them the up! 


The kids love breakfast foods anytime of day and since the egg bowl is currently overflowing I thought they would enjoy a brunch today.  So today they had individual quiches filled with ham, cheddar cheese, spinach, peppers, mushrooms and scallions.  They smelled delicious while they were baking this morning.  The quiches should be pretty filling so I topped their lunches off with some melon, grapes and some cinnamon graham cookies.  Eggs-ellent!